For me, the most important thing for a fibre artist, is the play aspect... By playing (technically experimenting, but I prefer to call it play as it sounds more like fun), we often stumble upon wonderful ideas. In our Transitions group, one of our members Brenda Dickeos reintroduced us to the simple paper folding and cutting technique, also known as snowflakes. It reminded us of our childhood and art classes at primary school - this simple technique provides endless design possibilities for a quilter who enjoys pushing the boudaries.
I used the technique in the Glow quilt as well as the Bag-a-Square workshop where I used the technique to prepare tiles for certain sections. I so enjoyed the process that I decided to make a table runner for a small side table using this technique. I prepared 8 tiles, each using different fabrics in neutral shades. The continuous thread would be the one tile design. The cut out section was fused to the base of the tile with the use of applique paper, the excess of the base fabric was cut away to match the edges of the tile.
Paper Cut Tile
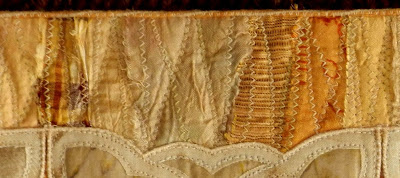
The next step was to prepare the border section before the tiles were stitched. Recycled sari silk ribbon was used for this and randomly fused to the sides of the runner and roughly stitched down to the foundation fabric.
Border section
After the border section was stitched, the tile section was placed and fused on top of it. The raw edges were secured with raw edge applique in a matching colour thread, this also doubled up as the quilting. A lovely ivory shade DMC crochet cotton was couched around the edges of each tile to give it a lovely finish. This added some texture and definition. The outer edges of the runner was finished off with couched cords.
Finished runner (bad colour quality!)
Paper cutting designs is a simple way of creating your own patterns. The only complicated question is how to stitch the blocks... I used a washout marker and connected the spaces to try and find a stitching path which will somehow add movement and interest to the block!
In a similar exercise, I cut a bigger block/tile for a cushion cover. This was more complicated due to the size, but I'm thrilled with the result! I used a fat quarter (border section) as colour inspiration.
Paper Cut Cushion Cover
After completing the stitching, it somehow looked incomplete and flat... After staring at it for a few days, I realized that the edges around the cut out section and around the teal border, looked "bare", it needed additional work! Because I thought it would be tricky to navigate couched cords around the edges, I decided to embroider whipped chain stitch around the teal edge and bead around the cut out design. I had a huge packet of flat, neutral shade wooden beads which were perfect... It transformed the entire design and I was so happy with the end result. I used the outer edge of the motif to echo quilt the border.
Embroidery and beading detail.
Happy stitching, hope you have time to play!


