Teaching Philosophy

I feel successful when I teach people:

- to see what they look at!

- that it is ok to be different!

- to open a whole new world of creativity for them....

- that there is a solution for every problem (mostly with a quick-unpick!)

- that it is a joy to be creative......


The Creative Mind Plays with the Object it Loves -
Carl Jung


Sunday, 9 September 2012

Scraps to Funky Threads...!

My friend Wendy Singer and I spent a wonderful day playing with scraps in 2000 before her family moved to the UK - the result was two very innovative waistcoats.     I loved the concept so much that I turned it into a workshop.  

In short, I randomly cut triangles in different sizes and shapes, pinned it to a base fabric and stitched the triangles down using a triangular motion in various threads, ranging from ordinary sewing thread to glitzy metallics.   In the process, I made new fabric which offered various possibilities.....    I taught this workshop at a Fynbos event in Riebeek Kasteel and one of my students worked with circles on black, absolutely stunning.

As I love to sew my own clothes, I decided to make an outfit for the wedding of the daughter of dear friends...   The project was actually very ambitious and I had to add the outfit to my UFO heap as time ran out ....    Soon it was time for another wedding and I had this outfit which was halfway....    So, I continued my endless stitching and finished it in time.....

The outfit was a plain shift dress and a funky jacket in jewel colours.     I used the same concept which I initially used of stitching randomly cut triangles to a base fabric for the waistcoat in 2000, but this time I used wash-away Avalon and Avalon Plus instead of a base fabric...   My idea was to create a lacy effect fabric which I then used to cut the different sections of the jacket....    I had no idea whether it would work and battled with these huge pieces of Avalon (washaway plastic) which stuck to the machine bed all the time while navigating lots of pins keeping the triangles (cut of cotton, linen, velvet, upholstery, tulle, lace, taffeta, satin, silk, chiffon etc) in place drawing blood from my arms etc...   Lots of baby powder helped to keep it smooth while stitching.    I stitched and stitched and stitched......   I had to add enough stitching between the triangles to keep it secure so that it would not disintegrate when washing the Avalon away or be too fragile for a garment...    I used the same thread on the bobbin throughout as it would be an integral part of the inside of the fabric.   I changed the top thread regularly using all the different colours in the triangular scraps, starting with ordinary sewing thread and finishing with glitzy metallic threads.    I was very anxious when it was time to wash the Avalon away and I was enthralled with the first piece, it was even better than I envisioned.    It was a major task to wash all the the Avalon out - failing to do so leaves a sticky, tough residue on the article.    The new fabric was lovely and soft, full of texture.

A piece of the  newly created fabric before Avalon was washed away

I adapted a Burda blouse pattern to  make a pattern for the jacket.   As the edges of the fabric was very fragile, I had to finish it off with some reinforcing technique.   I prepared a facing of the same fabric as the dress and fused applique paper to it instead of vilene.  I stitched the facing to the inside of the jacket edges, clipped and folded it over to the right side and fused it down around the edges of the neck, front opening and hem, doing the same around the sleeve hems.    It provided a strong secure edge which would ensure that the  jacket would not disintegrate.   I embellished these facings by couching various variegated raw silk yarns and rayon cords and finished it off with interspersed beading and sequins.   

Embellished Edge of Jacket


The only thing which I bought to make this jacket was the Avalon!    I created a very special jacket using  scraps and my thread stash.    And the beauty is that nobody else has a little number like mine...!


My husband Willem and me wearing my funky threads!

Monday, 27 August 2012

Creating with junk....

As a fun idea, our group decided to do a recycled project in 2010....    Each member could choose 2 items which gave us 8 articles to create something with....   Plastic veggie bags, string, soda cans, corks of wine bottles, rusted nails (woodwork type), newspaper, sweet wrappers and tumble dryer lint had to be transformed into an art piece...!   It was amusing how we collected stuff and a section of my studio looked like a waste dump....  

There was nothing pretty to inspire me, no interesting fabrics, no lovely beads, threads or awesome scene from nature...., just junk!    Inspired by my friend Brenda Dickeos who used teabags in a previous quilt, I decided to incorporate teabags in my piece....  

I read the newspapers (one item on our list) with more interest than usual as I wanted to make a newsworthy piece.....   The world was rocked by terrible earth quakes in the beginning of 2010 and we were regularly reminded of the devastation of these natural disasters by regular photographs in the daily press.   I started collecting articles and pictures of the devastating quakes in Haiti, Chile and China - the images reminded me of the chaos of the heap of junk in my studio....

I prepared a small panel with the tea bags using textile podge medium to secure it to a fabric background.   As I used Rooibos teabags, a rich rusty colour pigment seeped through the podge.    I embellished this panel with all the items on the list to create the rubble and chaos of damaged buildings ......    I melted the veggie bags, painted the tumble dryer lint with fabric paint to make it more stable, cut strips of soda cans which I twisted, pressed holes in slices of the corks and glued the small pieces down, cut the sweet wrappers and stitched it together using a needlelace technique, couched string down to show cables in disarray, rusted nails glued down (poles) etc, etc....  

Natural Disasters 2010 - Centre Panel

This small panel was quilted before it was placed off centre on a bigger piece of fabric which was covered with script from various newspapers telling the horror stories of the various earth quakes.    I also used captions which I placed randomly over the articles.    The newspaper cuttings was also secured to the fabric with textile podge medium.    I used watercolour artist paint on the wet podge medium to add some colour to the newsprint section.  

I did not like the dimensions of this piece so far and decided to add sections at the bottom of the quilt, very much like a Ndebele skirt.   This way I could also balance the colours used in the centre panel.....   I prepared small  teabags sections as basis and podged newspaper pictures of the various quakes over it which seemed to do the trick.    I made beads from the corks, soda cans, newspaper and added wooden beads to hang between these small picture panels.     I made cords using perle threads to finish off the raw edge around the quilt and secure the small panel to the bigger quilt.

Natural Disasters 2010


It was a rather strange quilt to make and I still don't have strong emotions about it....     But, it also reminds how precious life is which can be cut short at any moment....   Carpe Diem....

Saturday, 18 August 2012

Being a Quilt Teacher....

On reflection, creating the two Transition quilts also had a huge influence on my teaching repertoire which actually started when I created the Fun with Chain Stitch cushion.

For a teacher, developing new workshops is very important...!    Although it really is hard work to keep producing interesting workshops, it is wonderful to see the enthusiasm with which students react to new concepts.        For me it is wonderful to be instrumental in giving students the freedom to explore beyond what they are taught in a workshop....

I like to offer new workshops for the National Quilt Festivals in South Africa.     It keeps me motivated to constantly push my own boundaries by exploring and developing new ideas.    Currently I love mixing hand and machine embroidery with other freestyle techniques and of course, lots of beading....!    As developing new workshops is hugely experimental, a great deal of waste occurs....    Huge amounts of expensive embroidery threads are unpicked and discarded not to mention wasted hours....    Often I will struggle with a piece for weeks/months and then suddenly, things will fall into place and I will find my way how to teach it.    It is not only about making a new piece, but working out the teaching sequence as well as avoiding potential problems.....    Unfortunately not all good ideas, make great teaching material...   So, workshops are carefully planned to challenge students to explore within the safety of a workshop environment.    The teacher has to advise them how to avoid pitfalls and give them the tools to experiment on their own...    It is also very important to allow students to work in a way with which they are comfortable as it keeps the stress levels low and put them at ease as not all students work well in a classroom environment.    Above all, the teacher must have a good knowledge of her subject, be in control of her workshop and show respect for  her students....

Personally I prefer to offer technique workshops which I present in a small wallhanging format or a usable article - that way the student  has something to show for her effort.    I love it when students take my ideas and make it their own.....

I developed two workshops in 2010 which I taught at the 2011 National Quilt Festival in Stellenbosch, Fun with Free Motion and Explore Machine Stithing & More....    I really enjoyed teaching both these workshops and I continue to do so....    

Explore Machine Stitching & More 2010
Irregular shape quilt with focus on embellishing techniques, discharging of fabric and  free motion  machine stitching.  More info on Workshops page

Fun on the Edge 2010
Raw edge applique with free motion machine quilting and embroidery.  
Use of oil and pastel paint sticks for shading.
More info in Workshops page

Both these samples were made using scraps!

Thursday, 9 August 2012

National Colours...

Watching the London 2012 Olympics, brought back memories of the 2010 Soccer World Cup which was held in South Africa!   I can still recall the intense excitement in the streets, shops, newspapers, radio and TV.....!    There was so much goodwill among all the people and as a nation, we were all so immensely proud of successfully hosting this major sports event.   Seeing our team winning medals in London, brought back the good vibe of 2010...

To commemorate this event in South Africa, the Natal Quilters's Guild had a special challenge "Images of Sport" and I was fortunate to receive an invitation from their Guild to participate.   Participants could portray any sporting discipline whatsoever....  

My initial idea was to make a realistically themed quilt using photographs of a sportswoman in action and adding quotes from her inspirational talks.........     I really battled to make contact with her and I was extremely disappointed when her agent eventually responded to my request  and refused permission to use any material of my sporting icon....

So, rather despondently I had to rethink my concept....   I decided the safe thing was to make an anonymous quilt depicting soccer players all dressed in Bafana kit!     I collected pictures of soccer players in action from the local newspapers and started work - the images were from players from all over the world disguised in Bafana kit!    But I must admit, I felt a bit deflated and I battled initially to get started ....

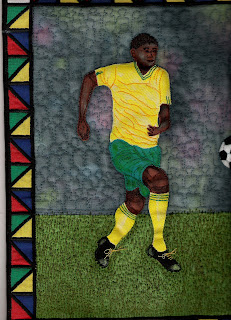
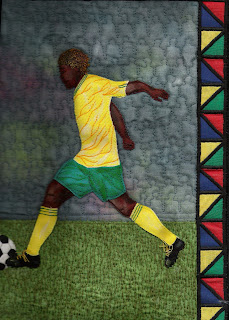
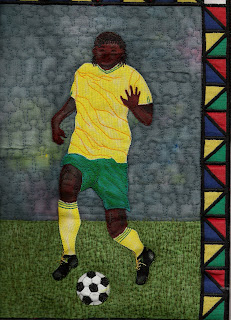
I prepared patterns for my little men, depicting all the race groups in South Africa and chose to work in the colours of our National flag.    I used fabric paint to add shading to the little men...


The eight blocks of National Colours 2010

Making hair for the players was great fun!    I used the needlelace machine embroidery technique as well as painted tumble dryer lint to make wigs for the 8 players - some players had short hair, others dreadlocks....    Creating boots and soccer balls were great fun!    I used yellow embroidery thread for the shoe laces....    I used green painted iron-on-vilene for the pitch and quilted in green thread to create the illusion of grass.   As I studied the newspaper photographs of the sportsmen, I observed that because the cameras were focused on the players, the crowds in the stands were out of focus causing a blurred vision of colour.... I painted fabric creating this blurred background and quilted head and shoulder shapes to create the illusion of crowds in the stands watching the game....

I framed each of the 8 blocks with a narrow geometric border in the colours of our National flag and stitched it onto black background fabric.    I added another geometric border to the outer edge of the quilt, leaving an open section onto which I quilted hexagons using a variegated thread in the colours of the geometric borders.  I added beadwork bought from street vendors - loveletters with the SA flag as design and round coasters representing the shape of a soccer ball  to add additional interest and a uniquely South African vibe.    

National Colours 2010
I made a special label for this quilt - using the shape of a soccer ball!

National Colours 2010 Label!

Some close-up detail of the quilting in the border section....