Teaching Philosophy

I feel successful when I teach people:

- to see what they look at!

- that it is ok to be different!

- to open a whole new world of creativity for them....

- that there is a solution for every problem (mostly with a quick-unpick!)

- that it is a joy to be creative......


The Creative Mind Plays with the Object it Loves -
Carl Jung


Saturday, 27 October 2012

Port Elizabeth - Legacy of Settlers

It is such a long time since I had time to post on this blog as I had teaching trips to George and East London with our annual Spring Show of the Dias Quilters' Guild in between the trips and to top it off, the most amazing fundraising Tea for Festival 2017 funds a week ago...!   Life is busy in Port Elizabeth!

I started a quilt of historical buildings of Port Elizabeth in 2006, but had to abandon it due to time restrictions and time out due to spinal surgery.    I shelved this project for one day....   As I hate UFO's, the niggling guilty feeling of not finishing this piece kept on bugging me, so I decided early in 2011 to finish this quilt.   It was extremely difficult to regain the initial momentum and rhythm, indeed a reason why I don't like to interrupt a project.

After 5 years, I was very critical of the work already finished on this quilt.    I unpicked one entire block and re-started from scratch, only keeping the painted sky section!    Another block also had the pick-unpick treatment!     I slowly regained the momentum and picked up speed.   I realized that maybe it was good that I was forced to abandon work on this quilt as somehow I was so happy with the second take on it....

I completed the blocks and started sewing the quilt together.    The quilt was really a combination of techniques and was really a test for my skills - it was really the most complex and challenging quilt which I have ever made.    I could not find fabric for the church walls, so I painted stone walls with a tiny brush.    I used Avalon Plus to embroider the wrought iron fence around the church yard.    Avalon Plus was also used to do the gates of the Grey Institute, one of the first schools in Port Elizabeth and the gates at the Public Library.    I added the Campanile as it was erected to commemorate the centenary of the landing of the 1820 Settlers in Port Elizabeth.

Close-up detail of the 4 main blocks:

Holy Trinity Anglican Church, Port Elizabeth
City Hall, Port Elizabeth
Public Library, Port Elizabeth

Grey Institute, Port Elizabeth


We are blessed in Port Elizabeth with a large heritage of beautiful historical buildings.    I used some of the buildings as quilting designs in the border of this quilt.    The Pearson Conservatory fitted perfectly in the bottom section of the border.    I also quilted one of the oldest houses in Port Elizabeth, No 7 Castle Hill (now a museum) and a section of the Donkin Street terrace houses into the border as well as other interesting buildings.    I prepared a quilting panel of a section of a wrought iron fence around the St Johns Methodist Church for the top section of the border.    

As I was quilting, I was delighted with the effect which I was creating as I felt that I actually succeeded in using the quilting process to extend the design of the quilt.    I also realized that although I loved the freedom and creativity of the art quilts, these realistic quilts really are such a tremendous challenge and I just love creating them....   It is such a thrill to succeed, yet a very humbling and spiritual experience....

Port Elizabeth - Legacy of Settlers 2011
My son Jopie escorted me on various trips to take photographs of the historical buildings.   I used 35mm film for photographs while he used his digital camera.    I used both photographs and images on the computer for detail and to prepare patterns to work from.    When it was time to quilt the border, it was the turn of my husband Willem to accompany me on further photography trips as I needed images of more buildings....   So, this quilt was really a family affair....


This quilt was awarded Best Machine Workmanship at the 2011 National Quilt Festival which was held in Stellenbosch.

It is part of a selection of South African quilts and currently in the United States of America where it is on show at four different venues as part of the 2012 World Quilt Competition.

Sunday, 9 September 2012

Scraps to Funky Threads...!

My friend Wendy Singer and I spent a wonderful day playing with scraps in 2000 before her family moved to the UK - the result was two very innovative waistcoats.     I loved the concept so much that I turned it into a workshop.  

In short, I randomly cut triangles in different sizes and shapes, pinned it to a base fabric and stitched the triangles down using a triangular motion in various threads, ranging from ordinary sewing thread to glitzy metallics.   In the process, I made new fabric which offered various possibilities.....    I taught this workshop at a Fynbos event in Riebeek Kasteel and one of my students worked with circles on black, absolutely stunning.

As I love to sew my own clothes, I decided to make an outfit for the wedding of the daughter of dear friends...   The project was actually very ambitious and I had to add the outfit to my UFO heap as time ran out ....    Soon it was time for another wedding and I had this outfit which was halfway....    So, I continued my endless stitching and finished it in time.....

The outfit was a plain shift dress and a funky jacket in jewel colours.     I used the same concept which I initially used of stitching randomly cut triangles to a base fabric for the waistcoat in 2000, but this time I used wash-away Avalon and Avalon Plus instead of a base fabric...   My idea was to create a lacy effect fabric which I then used to cut the different sections of the jacket....    I had no idea whether it would work and battled with these huge pieces of Avalon (washaway plastic) which stuck to the machine bed all the time while navigating lots of pins keeping the triangles (cut of cotton, linen, velvet, upholstery, tulle, lace, taffeta, satin, silk, chiffon etc) in place drawing blood from my arms etc...   Lots of baby powder helped to keep it smooth while stitching.    I stitched and stitched and stitched......   I had to add enough stitching between the triangles to keep it secure so that it would not disintegrate when washing the Avalon away or be too fragile for a garment...    I used the same thread on the bobbin throughout as it would be an integral part of the inside of the fabric.   I changed the top thread regularly using all the different colours in the triangular scraps, starting with ordinary sewing thread and finishing with glitzy metallic threads.    I was very anxious when it was time to wash the Avalon away and I was enthralled with the first piece, it was even better than I envisioned.    It was a major task to wash all the the Avalon out - failing to do so leaves a sticky, tough residue on the article.    The new fabric was lovely and soft, full of texture.

A piece of the  newly created fabric before Avalon was washed away

I adapted a Burda blouse pattern to  make a pattern for the jacket.   As the edges of the fabric was very fragile, I had to finish it off with some reinforcing technique.   I prepared a facing of the same fabric as the dress and fused applique paper to it instead of vilene.  I stitched the facing to the inside of the jacket edges, clipped and folded it over to the right side and fused it down around the edges of the neck, front opening and hem, doing the same around the sleeve hems.    It provided a strong secure edge which would ensure that the  jacket would not disintegrate.   I embellished these facings by couching various variegated raw silk yarns and rayon cords and finished it off with interspersed beading and sequins.   

Embellished Edge of Jacket


The only thing which I bought to make this jacket was the Avalon!    I created a very special jacket using  scraps and my thread stash.    And the beauty is that nobody else has a little number like mine...!


My husband Willem and me wearing my funky threads!

Monday, 27 August 2012

Creating with junk....

As a fun idea, our group decided to do a recycled project in 2010....    Each member could choose 2 items which gave us 8 articles to create something with....   Plastic veggie bags, string, soda cans, corks of wine bottles, rusted nails (woodwork type), newspaper, sweet wrappers and tumble dryer lint had to be transformed into an art piece...!   It was amusing how we collected stuff and a section of my studio looked like a waste dump....  

There was nothing pretty to inspire me, no interesting fabrics, no lovely beads, threads or awesome scene from nature...., just junk!    Inspired by my friend Brenda Dickeos who used teabags in a previous quilt, I decided to incorporate teabags in my piece....  

I read the newspapers (one item on our list) with more interest than usual as I wanted to make a newsworthy piece.....   The world was rocked by terrible earth quakes in the beginning of 2010 and we were regularly reminded of the devastation of these natural disasters by regular photographs in the daily press.   I started collecting articles and pictures of the devastating quakes in Haiti, Chile and China - the images reminded me of the chaos of the heap of junk in my studio....

I prepared a small panel with the tea bags using textile podge medium to secure it to a fabric background.   As I used Rooibos teabags, a rich rusty colour pigment seeped through the podge.    I embellished this panel with all the items on the list to create the rubble and chaos of damaged buildings ......    I melted the veggie bags, painted the tumble dryer lint with fabric paint to make it more stable, cut strips of soda cans which I twisted, pressed holes in slices of the corks and glued the small pieces down, cut the sweet wrappers and stitched it together using a needlelace technique, couched string down to show cables in disarray, rusted nails glued down (poles) etc, etc....  

Natural Disasters 2010 - Centre Panel

This small panel was quilted before it was placed off centre on a bigger piece of fabric which was covered with script from various newspapers telling the horror stories of the various earth quakes.    I also used captions which I placed randomly over the articles.    The newspaper cuttings was also secured to the fabric with textile podge medium.    I used watercolour artist paint on the wet podge medium to add some colour to the newsprint section.  

I did not like the dimensions of this piece so far and decided to add sections at the bottom of the quilt, very much like a Ndebele skirt.   This way I could also balance the colours used in the centre panel.....   I prepared small  teabags sections as basis and podged newspaper pictures of the various quakes over it which seemed to do the trick.    I made beads from the corks, soda cans, newspaper and added wooden beads to hang between these small picture panels.     I made cords using perle threads to finish off the raw edge around the quilt and secure the small panel to the bigger quilt.

Natural Disasters 2010


It was a rather strange quilt to make and I still don't have strong emotions about it....     But, it also reminds how precious life is which can be cut short at any moment....   Carpe Diem....

Saturday, 18 August 2012

Being a Quilt Teacher....

On reflection, creating the two Transition quilts also had a huge influence on my teaching repertoire which actually started when I created the Fun with Chain Stitch cushion.

For a teacher, developing new workshops is very important...!    Although it really is hard work to keep producing interesting workshops, it is wonderful to see the enthusiasm with which students react to new concepts.        For me it is wonderful to be instrumental in giving students the freedom to explore beyond what they are taught in a workshop....

I like to offer new workshops for the National Quilt Festivals in South Africa.     It keeps me motivated to constantly push my own boundaries by exploring and developing new ideas.    Currently I love mixing hand and machine embroidery with other freestyle techniques and of course, lots of beading....!    As developing new workshops is hugely experimental, a great deal of waste occurs....    Huge amounts of expensive embroidery threads are unpicked and discarded not to mention wasted hours....    Often I will struggle with a piece for weeks/months and then suddenly, things will fall into place and I will find my way how to teach it.    It is not only about making a new piece, but working out the teaching sequence as well as avoiding potential problems.....    Unfortunately not all good ideas, make great teaching material...   So, workshops are carefully planned to challenge students to explore within the safety of a workshop environment.    The teacher has to advise them how to avoid pitfalls and give them the tools to experiment on their own...    It is also very important to allow students to work in a way with which they are comfortable as it keeps the stress levels low and put them at ease as not all students work well in a classroom environment.    Above all, the teacher must have a good knowledge of her subject, be in control of her workshop and show respect for  her students....

Personally I prefer to offer technique workshops which I present in a small wallhanging format or a usable article - that way the student  has something to show for her effort.    I love it when students take my ideas and make it their own.....

I developed two workshops in 2010 which I taught at the 2011 National Quilt Festival in Stellenbosch, Fun with Free Motion and Explore Machine Stithing & More....    I really enjoyed teaching both these workshops and I continue to do so....    

Explore Machine Stitching & More 2010
Irregular shape quilt with focus on embellishing techniques, discharging of fabric and  free motion  machine stitching.  More info on Workshops page

Fun on the Edge 2010
Raw edge applique with free motion machine quilting and embroidery.  
Use of oil and pastel paint sticks for shading.
More info in Workshops page

Both these samples were made using scraps!

Thursday, 9 August 2012

National Colours...

Watching the London 2012 Olympics, brought back memories of the 2010 Soccer World Cup which was held in South Africa!   I can still recall the intense excitement in the streets, shops, newspapers, radio and TV.....!    There was so much goodwill among all the people and as a nation, we were all so immensely proud of successfully hosting this major sports event.   Seeing our team winning medals in London, brought back the good vibe of 2010...

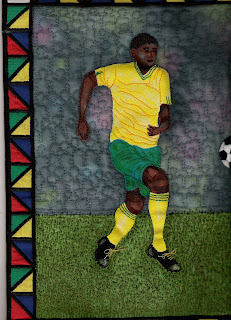
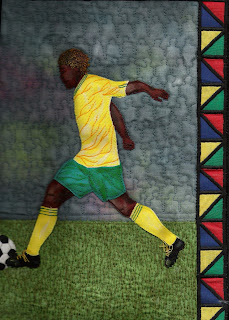
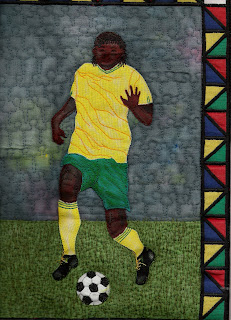
To commemorate this event in South Africa, the Natal Quilters's Guild had a special challenge "Images of Sport" and I was fortunate to receive an invitation from their Guild to participate.   Participants could portray any sporting discipline whatsoever....  

My initial idea was to make a realistically themed quilt using photographs of a sportswoman in action and adding quotes from her inspirational talks.........     I really battled to make contact with her and I was extremely disappointed when her agent eventually responded to my request  and refused permission to use any material of my sporting icon....

So, rather despondently I had to rethink my concept....   I decided the safe thing was to make an anonymous quilt depicting soccer players all dressed in Bafana kit!     I collected pictures of soccer players in action from the local newspapers and started work - the images were from players from all over the world disguised in Bafana kit!    But I must admit, I felt a bit deflated and I battled initially to get started ....

I prepared patterns for my little men, depicting all the race groups in South Africa and chose to work in the colours of our National flag.    I used fabric paint to add shading to the little men...


The eight blocks of National Colours 2010

Making hair for the players was great fun!    I used the needlelace machine embroidery technique as well as painted tumble dryer lint to make wigs for the 8 players - some players had short hair, others dreadlocks....    Creating boots and soccer balls were great fun!    I used yellow embroidery thread for the shoe laces....    I used green painted iron-on-vilene for the pitch and quilted in green thread to create the illusion of grass.   As I studied the newspaper photographs of the sportsmen, I observed that because the cameras were focused on the players, the crowds in the stands were out of focus causing a blurred vision of colour.... I painted fabric creating this blurred background and quilted head and shoulder shapes to create the illusion of crowds in the stands watching the game....

I framed each of the 8 blocks with a narrow geometric border in the colours of our National flag and stitched it onto black background fabric.    I added another geometric border to the outer edge of the quilt, leaving an open section onto which I quilted hexagons using a variegated thread in the colours of the geometric borders.  I added beadwork bought from street vendors - loveletters with the SA flag as design and round coasters representing the shape of a soccer ball  to add additional interest and a uniquely South African vibe.    

National Colours 2010
I made a special label for this quilt - using the shape of a soccer ball!

National Colours 2010 Label!

Some close-up detail of the quilting in the border section....

Sunday, 29 July 2012

A different angle to inspiration from nature...

The second project of our Transitions group was to make a background of strips and do something with it....!     

On one of our trips, Willem and I stayed at the Riebeek Valley Hotel in Riebeek West.   Walking around the beautiful gardens, I was taken with the bark of a huge pine tree and took photographs as inspiration for maybe one day.....     While putting my fabrics together for our next project, somehow this image of the bark kept coming back to me...    I decided that I was ready to use this photograph as inspiration for my second art quilt.

Bark of a pine tree - photo taken in Riebeek West
I prepared a piece using strips of cotton, taffeta, upholstery fabric and even peach skin in various widths.    Quite a variety of fabrics indeed!    I singed some of the edges with a candle to give it interesting edges and lines before stitching it together.  Somehow I worked in the same colour range as Tranformation - Glow Beyond the Scorched Earth.....    

I started work on this quilt while I was also working on Transformation - Glow Beyond the Scorched Earth.    It was so much easier to work on this piece - maybe I had made the transition to a different way of working....    I added more strips of singed chiffon, taffeta and even tulle to the foundation piece as part of the embellishment and stitched hand embroidery stitches in a very random way using variegated perle no 8 threads.   I also couched cords and recycled silk yarns to the piece.    I finished the embellishment with motifs which I made from copper wire and other metal pins used for making earrings as well as a variety of glass and metal beads.....
Centre panel of Transformation - An Ode  to Trees 2009
We were discussing discharging of fabric at one of our meetings and I started experimenting with odd pieces of black fabric and were absolutely thrilled with the result.   I promptly used two pieces for the side panels of the quilt and bought a lovely piece of screen printed fabric from Pam Stallabrass which was just perfect for the top section of the quilt (although I used the reverse side of the fabric)....    The pieces of fabric lent itself to a Kimono shape quilt.....    

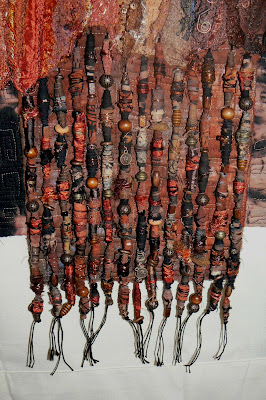
I made fabric beads to use in a fringe for the bottom of the quilt mixed with wooden and metal beads.   On one of our trips, I collected quills of porcupines which were run over while trying to cross the road in a remote area...    I desperately wanted to use some of the quills in this quilt.....     As the beaded fringe at the bottom were quite bulky, I added beads hanging from T-section with porcupine ends secured with copper wire which seemed to balance the bottom fringe.     The quilt was machine quilted and the edges were secured without bindings which added more texture.
Side section using discharged black fabric and porcupine quill ends  finishing the beading.
Beaded fringe at bottom of quilt

I gave this quilt to my daughter Elizabeth.    While shopping for beads, I found small little copper coins with the image of Elizabeth I and had to buy it....!    I embellished some of the fabric beads with the little coin, truly a quilt for the namesake...!

The centre panel of this quilt is heavily stitched and embellished with beads etc...    I believe it is a fine art to know when to stop embellishing as too much can also spoil a wonderful piece of work.    My motto is when in doubt, don't or stop!    

I named the quilt Transformation - An Ode to Trees.    Transformation as I was still in the process of adapting to this new way of quilting and because I used so much of the same fabric as Glow Beyond the Scorched Earth.   I also worked on these two quilts at the same time, it almost felt like quilts in a series.     As my initial inspiration was the photograph of the tree bark which I took in Riebeek West, I had to pay tribute to trees .....

Transformation - An Ode to Trees 2009


My realistically themed quilts were all inspired by nature -  so it was an interesting challenge to use an element from nature to create this quilt....!     I felt very blessed to have created these two Transformation  quilts.......

Sunday, 15 July 2012

Into the world of art quilts....

The journey on which my first art quilt Transformation - Glow Beyond the Scorched Earth took me, was intense, frustrating and utterly thrilling.    It taught me patience as I had to sit back and wait for inspiration for the next step until it was done.....    The quilt developed as I progressed and I had no idea how it would look  finally...     It finally set me free to create to my hearts content....


Forming the art quilt group Transitions had a profound effect on my quilting journey....   After working in a set format for such a long time, it was difficult to suddenly change gears...    All of a sudden I could not rely on first getting the "mental picture" of my realistic quilts as I needed to let go of the creative control I had of all phases of my work.   It was such an intense challenge which was very frustrating as it left me feeling out of sorts ...   The transition was very difficult...


As the first project for our new group, we decided to each choose a shape to make a small quilt.  I chose a square as shape and quickly cut and fused different sizes of squares onto half of a fat quarter as background...    I pinned it to my design wall and wondered where this would take me as I had no idea....    My biggest concern was that I could see no change to my previous work of similar design...    I became terribly frustrated and irritated as I sat staring at it every day.....    After about two weeks, I realized that the edges were too perfect and I needed  more uneven lines - I promptly removed the square patches from the background, lit a candle and started burning the raw edges!   Just perfect!   I burnt the edges of the background fabric to complement the uneven edges of the motifs...   At last I felt I made some progress....   


 My initial idea was to machine stitch the entire quilt and embellish it with beading...   I used the raw edge applique method to secure all the motifs to the background, but somehow it looked too plain and flat...    I played with some metal and glass beads and realized the texture difference between the beads and machine stitching was too severe, I needed something as filler in between....     I was stuck again!    I promptly placed the piece back on the design wall and waited for inspiration...     I tentatively experimented with some hand embroidery stitches which immediately added another dimension to the embellished squares.     


Centre panel of quilt  (on its side for better viewing)
I extended the quilt by adding off cuts around the centre panel in a very unconventional way - it would be the border of the quilt!   I found bits of leather in my stash with very interesting uneven edges to add in between the centre panel and the border sections.    Somehow, working on this quilt, became easier and very exciting....

At our first creative meeting, we made fabric beads which was great fun.    It lifted the spirits in the group as all of us felt a bit intimidated by the challenge of "jumping out of our rigid boxes"...    As I was taking tentative steps with my first art quilt effort, I decided to add a beaded fringe to the quilt and made beads using the same colour palette as the "not so square anymore" motifs.    I also burnt most of the edges of the fabric for the beads to keep the effect the same as the motifs.   Burning the edges, left a very dark edge which was perfect for the earthy colours in which I was working....   I felt the first stirrings of excitement....   But it was still a long way to go...   


Fabric beads mixed with wooden, clay and metal beads.
Brenda sent me some creative quotes to be used as inspiration in our group and I could especially relate to one by Carl Jung:
 The creation of something new is not accomplished by the intellect
But by the play instinct acting from inner necessity.
The creative mind plays with the objects it loves.
I decided to decorate one panel of this quilt by writing this quote repeatedly!    I also used this quote as heading on the homepage of this blog...!

Panel with Carl Jung Quote above the bottom  beaded fringe

I also wrote on the one side panel, but somehow it did not look right....   The piece of fabric was just perfect and I wanted to use it, so I had to cover my mistake...   I burnt the edges of chiffon, tulle and organza strips and covered the writing with these strips...   It created lovely texture and I immediately liked it, but realized I had to counter balance it on the other side using a darker shade...   I decided not to cut the threads on the edge as it created extra texture ....
Side panel with strips of organza, tulle and  chiffon covering unwanted writing....!
The construction was done in an unconventional way.   I quilted the different pieces down onto the backing by working from the outside to the centre of the quilt!    As I chose the square as the initial design motif, I used it in the free motion quilting as well.    After completing the quilting and adding the beads to the bottom fringe, I realized that the quilt looked too heavy at the bottom....    I wrapped a short dowel with fabric and added a short beaded fringe to it which was attached to the top of the quilt which provided a good balance with the bottom beaded fringe.

Transformation - Glow Beyond the Scorched Earth 2009
Explaining the title........
Transformation:  I had to change my previous  way of working;
Glow :  I used lots of copper beads, wire & foil;
Beyond:  I had to delve deep within myself to accomplish this quilt;
Scorched:  Burning the edges of the fabric made this quilt happen like new growth;
Earth:  Referring to the earthy colours of the quilt and also a reflection of my personality....
Transformation - Glow Beyond the Scorched Earth 2009, my very first art quilt took about 6 months to make.    I entered it in the 2011 National Quilt Festival which was held in Stellenbosch, South African and I was gobsmacked when it was awarded Best on Show, Art Quilts!     

Saturday, 30 June 2012

Transitions.....

It is amazing how one takes a step back and re-evaluate life during/after a health problem.    I was forced to adapt to a slower pace of living - and I actually liked it.....         

Suddenly I had so much time to think - a recurring thought was something that my friend Charmaine said to me once!     She challenged my creativity by telling me that there was so much more to explore and I was actually in a rut!   Straightforward....!   After thinking it through, I realized it was so true...    I realized that the realistic themed quilts really consumed me while I was creating them and I needed something less intense.    For the first time since leaving East London, I somehow felt lonely and had the desire to belong to a quilt group.   BUT...........

Personally I find it very difficult to fit into a mould and after discussing it with a friend, she suggested that I start a small creative group....     The idea stewed in my mind for a long time before I approached 4 friends to form an art quilt group.    Three of them accepted the invitation and we met for the first time in February 2009 and tentatively  decided on the route forward.   We named our group Transitions - Beyond Borders!   We meet once a month in my studio and spend the time experimenting with different techniques,  equipment, gadgets, concepts etc.     The emphasis is on exploring with lots of cross-pollination and interaction while having fun.    

Starting the group, we all found the transition  from traditional and innovative techniques to freestyle/fibre art a huge challenge and extremely intimidating.   We desperately needed to get out of our boxes - quite a journey for all of us....!    I think the success of our small group is the fact that we are friends, there is mutual trust and respect, we served on committees together (so we work well together) and we are equal members within the group.   The interaction at our monthly meetings is lovely and we discuss problems we encounter with our projects and share advice (and criticism) freely.    We decided to keep the group closed as it was an experimental group and we did not really know where the journey would take us...

Transitions - Beyond Borders Group
From left to right - Brenda Dickeos, Marilyn Pretorius, Elaine Swan and Nadine van Westenbrugge

We often spend our time playing in the studio.   Brenda loves surfing the internet and often shares very interesting information and ideas.    We have all now settled into our own routine which is very peaceful and feels just right.     In the beginning we worked on specific projects, but as we are all in different phases in our lives, it became rather stressful to be productive all the time...   

Forming our art quilt group, had a major influence on my quilting style.   Next time I will show and tell my very first art quilt...


Friday, 22 June 2012

Changing the Pace...

I've missed chatting to you...   Willem and I enjoyed a 3 1/2 week holiday on a road trip to Namibia and are safely back home after driving 7 272 km.....   I wrote a journal while travelling and am thinking of adding a page to this blog about the trip...    As you know, most of my inspiration comes from nature and I took so many photographs of trees, rocks, landscapes, old buildings, lights, old furniture and animals...    A lot of it might be inspirational for fellow quilters, let me know what you think ....  We saw beautiful carved pieces of furniture, ideal for applique patterns, lots of interesting painted walls with all sorts of stenciling....     You can find me on facebook under Marilyn Stevens Pretorius....

Back to my story - after the 2006 National Quilt Festival in Port Elizabeth, I was emotionally and physically exhausted.   Making the majority of my quilts are really such an intensive process of concentration and  labour which while in the process, would consume most of my time, thoughts and energy.    I have no pattern books to refer to and have to find my own way, very exhausting...    I felt that I needed something easy to stitch which would be ideal to unwind.....  I decided to handsew a quilt using a Japannese Folded method.    Using this method, the quilt would be quilted by the time it was sewn together - just what I needed.  I decided to make a quilt for my friend for her next birthday.   Planning this quilt was so easy and uncomplicated, just what I needed.   

While making this quilt, something else happened....    I experienced a terrible pain down my one leg and eventually was diagnosed with a prolapsed disc in my spine, a condition which had a severe negative impact on my mobility and quality of life.    In the meantime, I quietly sat and stitched this quilt, not being able to do anything strenuous as it immediately brought pack the terrible pain.    I finished the quilt in time for her birthday in March 2007 and I was so surprized at  how much I actually enjoyed hand stitching this scrappy quilt......   Yes, me who are so in love with a sewing machine.....

My friendship with Amanda started early 1982, we had babies together, shared tears, laughs, losing parents and survived the phase of difficult teenagers...!    The two of us share a very special bond and the friendship has always been very harmonious, open, honest and easy - so referring to the our friendship, I named the quilt Harmonie (Harmony)!
    
Harmonie 2007 


Towards the end of 2007, it was clear I needed a spinal fusion.   I would be in a corset for 3 months, no sitting, driving my car or going anywhere in a vehicle.   I could lie down, walk and stand.   Wonderful recipe for cabin fever....    I immediately realized that I had to prepare some hand work to do afterwards....    Being productive, time would pass quickly....


I decided to make a quilt for our guest room in greens, teal and purple using the Folded Japanese method.    I wanted to make a quilt with triangles and decided to join 4 squares in a four patch, then fold it over batting in a diamond shape which will have the effect of a block with 4 triangles....    I prepared most of the blocks before going to hospital and packed a small trolley in our bedroom with enough work to keep me busy for the first days back at home...    I was ready to keep myself busy with books, music, tv and some quilting.....    I got a pair of reading glasses as it is very difficult to read flat on the back with bifocal lenses.....


Soon I was home, pain free and doing some stitching,  flat on my back....   My stitches were not great, but I was not perturbed..    I was sewing and excited about my project.    Soon I was stronger and Willem moved the trolley back to the studio where I could stand at the worktable because the height is perfect for me.     Soon it became routine, I would be in the studio with all my quilting stuff around me early in the mornings, taking breaks to rest a bit and my daily walk in the afternoons.    Soon the 195 blocks were stitched, quilted and ready to be joined into a quilt.   It took almost a week to arrange the blocks in a colourwash formation.   I pinned the rows together in long strips using safety  pins.    It was such a sense of achievement to make this quilt, mostly standing.     I should have called it "Standing Up" but named it Happy Colours for Me as it truly is my happy colours.   The 3 months went by so quickly...


Happy Colours for Me - 2008

While I was making this quilt, I  had lots of time to think about my quilting...........

Sunday, 13 May 2012

A dream come true...

The workplace of any creative person is such an integral part of the creative process...    

I always had a room in our homes which was my place where I could make a mess  until we moved back to Port Elizabeth in 1996.    Suddenly there was no extra room for all my sewing stuff and I had to make do with working all over in the house....    It was challenging as my quilting and later painting fat quarters for the brush rags range, took the house over....    It was a constant battle to try and maintain order in the house....    I always looked at the garage with long, droopy eyes, dreaming of converting it into a studio...   It would be perfect as it had a door leading into the house and I would have my own place safely inside our house.....   Then, one day Willem said that he would add on another double garage to the house and I could convert the existing double garage into a studio...    Oh, some dreams do come true....    A whole 33 square metres of my own creative space...

I think the most important thing when planning a studio is to establish your personal creative needs.   I needed ample storage space (cupboards) for all the clutter collected through a long period of time, I needed a zinc with hot and cold water for cleaning paint brushes and tubs after painting brush rags fat quarters, I needed an office with a workstation for the computer, printer and telephone at  hand as I continually found myself involved in Committee work and arranging teaching trips.   I also needed bookshelves, drawers, workstation for the sewing machines and of course a cutting/work table high enough for me to stand and work comfortably.    Enough natural light is important as well as wall space for a design wall, notice board etc.....   The kind of work which one does, also defines the floor covering.     If you convert an existing room in your house, you have to use and plan around what you have....

Planning the studio was such an exciting project for me as I could really do as I pleased!    I measured the inside of the old garage and drew it on a reduced scale and from there I did the layout of my studio.   I used two opposite walls for workstations, one for sewing and the other for an office with bookshelves, ample drawers for storage, computer, printer, telephone and hi-fi!   The zinc had to be on the outside wall close to the bathrooms to link up with drainage, geyser and water supply.   As I would use the studio to paint fat quarters as well, I chose the same quarry tiles for the floor as in the rest of the house.    With 3 walls used and lots of floor space left in the centre of the room, I planned a big cutting table for the centre of the room.    I designed two pedestal units, one with 2 deep drawers on either side and the other with deep storage spaces the depth of the table for rolls of paper, applique paper etc.    The table top would be 150cm x 240cm and would rest on the pedestals with a space in between the two  units.    Big enough overhang on the sides would ensure comfortable space to sit and work.    I also decided one could never have enough plug points, so I have 14!

After all this measuring, planning, adjusting and dreaming, I contacted the draughtsman to do the plans....   Waiting for the construction to start, I was in a fabric shop and saw beautiful curtaining in blue and green, very similar to hand painted fabric....    I rushed home to calculate from the building plans the sizes of the windows and rushed back to buy the fabric as it was exactly the colours which I wanted for the studio..   It was so exciting when the builders arrived and construction started.

Two weeks later, I had my dream studio!    The builder left on the Friday with the studio walls white to return on the Monday to find it painted seagreen!    I used two colours of paint, a teal and a green which I rubbed on with a cloth!    He was gobsmacked and asked me what the hell I did...!     It was the perfect match for all the white cupboards and the walls and curtains were really my creative colours.   It makes me happy when I walk into the studio in the mornings....  

It was such a relief to have a tidy house........!   It was with such a sense of adventure that I started moving into the studio.....


Workstation for sewing machines - worktop is 90cm deep.   Storage space below counter as well as above the sewing machines.

Worktable in centre of room with deep drawers and storages space for rolls of papers etc.   Zinc to the left of the picture with the big cupboard in background for fabric and quilts

Computer workstation (for contact with the outside world) with printer, telephone, hi-fi, drawers, bookshelves for books and files.

Storage space for hoops - on a bracket for gutters!
Some festival souvenirs

A quilted panel for my rosettes and collection of Guild and Festival badges on the side of the fabric cupboard.   Some teaching samples in the background.


The new studio proved rather strange in the beginning as it was so neat and tidy with everything having a place....   I realised after a while that I experienced the same feeling I normally had after finishing a major quilt project - tired after too much excitement!   It was really an anti-climax to have my own creative space again, especially one custom designed around my needs.   I really battled to settle down and be productive, I think I was scared that I would mess it up!    Luckily that feeling disappeared after some time and I have enjoyed many creative times in here.   I spend the biggest portion of my days in the studio doing various things always listening to the radio or some CD's.    I decided not to have a television set in here as it would be distractive - I prefer to listen while I work and only watch some telly in the evenings after supper....

Hope you enjoyed the visit in my studio.   I had to tidy it a bit for your visit - imagine the table strewn with stuff while I work as I am very messy worker.  

This is my last posting for a month as Willem and I are going on a trip to Namibia.....      

Sunday, 6 May 2012

Festival 2006

I was so intensely involved with the organising of the 2006 National Quilt Festival in Port Elizabeth which left me with very little time to quilt.   I did however design and oversee the making of a raffle quilt to raise funds for the festival.   As the theme of the festival was "Sands of Time", it lent itself to a traditional type of quilt.   Also, the public who would generally buy raffle tickets, were more likely to buy a raffle ticket for a bed quilt than a piece of wall art.  

I tend to prefer machine stitching to hand sewing, but I do love hand sewn stained glass applique work.    I brainstormed with my friend Joc Honeyborne who again love Celtic work about the feasability of making a stained glass quilt.    As we needed help to make this quilt, we identified quilters who had experience with either stained glass applique or Celtic work.     Fortunately everybody who were approached to help us sew, were very willing to help make this quilt.    The quilt had to be designed in such a way that we could cut and prepare each section and hand out ready for sewing.   We gave a deadline for the work to be completed after which I put all the different sections together.    It was a great sense of relief when all the sections fitted perfectly.   All the joining seams were hidden under the bias strips....     We used a very dark grey fabric for the endless bias strips patiently made by Joc.    I painted fabric for the quilt in pinks and greens, a safe colour choice for the masses.

The quilt was hand quilted by Dorothy Proctor-Golding in record time and eventually raised a substantial amount of money for festival funds.    One of our members bought a ticket on behalf of her daughter who lives in Australia and she was the lucky winner of the quilt.

Floral Window 2006 Raffle Quilt
The success of a festival depends on 3 very important aspects - a stunning display of world class quilts, wonderful and interesting workshops and of course the shopping mall....    Normally all other things take second place...   As in 1998 (when we also hosted the National Festival in Port Elizabeth), we decided to make the teachers small quilts with their names on to hang outside the classrooms on their teaching days.   It was eye catching and created a lovely atmosphere to walk along the corridors past all these little name banners....   I was asked to make the banners for the 3 teachers from overseas and I decided to use a South African theme and embellish it with ethnic beadwork.    As I did not know the teachers personally, it was a bit difficult to decide on colour, but I peeped around on their websites and hoped that I got it right......

The three name banners for Doerte Bach, Jenny Bowker and Pam Holland, the International Teachers at the 2006 Sands of Time National Quilt Festival held in Port Elizabeth

It is always lovely to receive such a personal gift at a Festival....  

Next time I will show you my studio as I have promised some time ago....    I have tidied, took some photographs and since then, created havoc once more....

Monday, 30 April 2012

A Fun Project

In 2005 our Guild launched a fundraising project for CANSA and the project was co-ordinated by Brenda Dickeos.   The members were challenged to make a embellished bra which would be auctioned off at a gala dinner to raise funds for cancer research....    Natal Quilters' Guild heard about our project and asked to join in the fun and eventually lovely entries were received from their Guild.    Some people chose to make their own bras, but I took a shortcut and bought an underwired bra ....    This project had the makings of great fun.  
As the deadline approached, I was getting rather anxious as I had no idea how to embellish my bra entry....     One day as I was pottering around, the idea for a protea bra started stewing in my mind....    The shape of a protea would lend itself to some sculpture moulding around a breast, ideal for a bra!   From there onwards it was rather easy.   The flowers had to be made using 3D machine applique techniques and the centres had to be hand embroidered with silk ribbon to recreate the lustre and texture of the inner flower.       I made each protea in 3 segments, the back (top) section with pointed petals which rested on the breasts which I stitched to the top of the bra, then the hand embroidered sections were inserted and moulded around the breast.    The bottom section of the bra was added last - the flowers fitted perfectly around the bra cup!     I made lots of separate leaves to cover the side and back sections of the bra with beaded ruffled strips to cover the straps.

On 8 October 2005 the bras were modelled and auctioned at a gala dinner at St Georges Cricket Stadium.    Great fun was had by all and entertainment included a bellydancer going through her paces....     As always, I battled to name my project!    As I was working, a title came to me...     In Afrikaans, the old people used to call Proteas suikerkanne and growing up, the youngsters would often call breasts in a crude way, kanne....!    So, my bra entry had a name - SUIKERKANNE!     The MC for the evening, Selwyn Morris from Radio Algoa was in hysterics everytime he had to refer to my bra and the crowd just loved the joke!    Suikerkanne was one of the winners of the evening and was bought by Keith Swan.   The bras were also displayed at the local quilt shop, Pied Piper.

Suikerkanne modelled at the Gala Dinner for CANSA 8 October 2005
This project really caused quite a stir and was repeated by some designers in Port Elizabeth after our Guild effort.   It really was a priviledge and great fun to be part of this project.

Sunday, 15 April 2012

New inspiration....

I'm back.....     I am sorry for the long silence, but last time I did mention that I had internet problems which resulted in picking up a foul virus with the result that I could not access this blog...   Well, at least that problem is now solved, but I wish life's obstacles were so relatively easy to get rid of....    I was also very involved in organizing our 40th school reunion which was so very special.

At the moment I am working on various projects which I have to complete and I am also preparing for a long holiday in Namibia with my Willem....   I promised you that I would show & tell my studio, BUT it is such a mess at the moment that I just cannot take photographs to show on this forum.....    I have lots of cupboards and drawers in the studio for storage, but when I am really engrossed in a project, all this stuff seems to land on my worktable, the floor, the couch, ironing board, strewn across the computer station etc....     All the cottons jump out of the containers and clutter the area between the sewing machines...    I somehow don't feel the need to put things away, bobbins, thread, presser feet, unpickers, a variety of scissors, machine needles, pins....   Working in a frenzy.....  And the mystery of it all is that somehow I know exactly where everything is within this chaos...    Yes, I am amazed that some quilt artists have this uncanny ability to work in such perfect tidy conditions.    Not me, the greater the mess, the more inspired I get and the better I perform.     So, I would love to show you my studio, but I don't think today is a good idea....   But I promise, very soon....

I ended the previous blog in 2004 in Durban.    As the 2006 National Quilt Festival was held in Port Elizabeth and presented by my home Guild, I decided that I could not stand for another term of office as SAQG President.     I felt that my loyalties had to be at home as our Guild is relatively small and all help and skills were needed to present a wonderful Festival.    Organizing such an event is very hard work, but such a wonderful opportunity for many reasons....   It builds so  much spirit in the hosting Guild and one always learns so many new skills and meet the most amazing people.      The Festival Chairlady unexpectedly left town and I had to step into her shoes, but with the support of a wonderful Committee, we pulled it off and hosted a wonderful event.     But due to all the Committee obligations, I had no time to finish my quilt entry of historical buildings of Port Elizabeth.   I rolled it up for one day when I wasn't tired anymore...   I did however prepare a new workshop, Sunset over Africa  for the Festival which I taught.  
Sunset over Africa Teaching Sample 2006
After the Festival, I was dog tired and decided that I really needed to do some hand sewing, just to relax...   As I really like hand stitching, I decided to make an embellished cushion which I took to the Guild meetings to keep my hands busy and I just played with threads, beads, shisha mirrors and sequins....    I used variations of chain stitch for the embroidery and as I was stitching at Guild meetings, I had many peeping toms looking at what I was doing and requesting a workshop....    So, I turned this cushion into a workshop and eventually into kits.   Unfortunately this cushion got lost in transit from Johannesburg to Port Elizabeth in 2008.  

          
                                                     Fun with Chain Stitch Cushion 2006
                                    made primarily of brush rags hand painted fat quarters.

I actually regard this cushion as the start of an exciting new era in my quilting.    I stitched it for the pure joy of stitching and creating some texture with threads and beads...